Showing posts with label 1940s. Show all posts

Thursday, February 13, 2014

Smocking Tutorial


Mining my vintage craft and sewing pattern book collection resulted in this neat smocking tutorial find.  This wonderful tutorial explains how to prepare your fabric for smocking without the need of a smocking pleater or iron on transfers. In addition, there is an explanation of how to modify your pattern for smocking and a diagram of several smocking stitches.  Loads of information in just a few short pages!


Nice information on how to modify your pattern to allow for smocked gathers:


How to create the gathers using your sewing machine:


Information and diagram of a few smocking stitches:


I love the can do attitude of this author.  She shows you how to tackle a project that looks complicated by breaking it down into manageable steps using tools you already have on hand.  The result?  An adorable little girl's dress.  And these techniques could be used on any article of clothing -- a special accent on a blouse  or on a lovely nightgown for yourself.  Enjoy this bit of wisdom from the past!

Wednesday, January 1, 2014

Happy New Year Apron Patterns!

Happy New Year everyone!  Every New Year brings with it renewed hope, dreams and ambitions.  One of my ambitions this year includes de-cluttering and what would be helpful in that department?  How about a fresh apron to keep my clothes clean!  

Whatever your ambitions are this year, a nice, new apron is always a delight.  So today I'm sharing a couple more lovely vintage apron patterns from the World War II era.  

They come from a vintage sewing book and you will need to draft pattern pieces before you begin sewing.

Previous sewing experience will be helpful when using these patterns and following the original directions.


Utility Apron


Instructions as they were originally printed:


The pattern pieces (additional instructions for how to draft your pattern are found at the end of this post):


Taffeta Party Apron

Now, of course, after the hard work is done it's time to celebrate! And what better way to celebrate than to doll up in a new taffeta party apron!  Of course you can use the fabric of your choice but how sweet this would be in taffeta:


Instructions as they were originally printed:


The pattern pieces:


The following information will be useful when making up your pattern pieces and sewing your aprons:


Of course I have other dreams and ambitions for the New Year, but first things first.  A clean, uncluttered space will encourage inspiration and creativity and be just plain nice.  I'm ready to get to work!

Happy sewing everyone and Happy New Year!


Tuesday, October 29, 2013

Cross Top Bib Apron Pattern

As promised, here is another great apron pattern from the same vintage World War II pattern book as the last pattern.  This pattern is a bit more challenging but the end result is worth it.  What a classic, lovely style!

Previous sewing experience will be helpful when using this pattern and following the original directions.


The instructions as originally printed:


You will need to draft your pattern using the following scale.  Each square represents an inch.


Back view of the finished apron:


For additional helpful information, check my previous post. You can find it here.  It includes information about how to scale your pattern and how to gather your fabric by machine.  I've got a couple more of these gems so check back soon!

Wednesday, October 23, 2013

Pretty Little Half Apron Pattern

This pretty little half apron pattern comes from a vintage 1945 pattern book.  There are several apron patterns in this book and I'll be sharing some of them over the next few days for your enjoyment.

You could make this apron in plaid as indicated or it would be just as cute in floral or novelty fabric.  

Previous sewing experience will be helpful.  However, if the instructions are followed carefully even a beginner could tackle this sewing project.


The instructions are printed here.  The "How to Make Patterns" description follows the pattern diagrams below.


Pattern diagrams to draft.  Each square represents 1":


The following information will help you to draft your patterns. You'll want to refer back to this information for future apron patterns from this pattern book series:


Back view of this half apron:


I love the look of this half apron and the ruffle detailing.  A perfect apron for entertaining!  

I'll be posting several more apron patterns from this vintage pattern book so keep checking back for more freebies!  Happy Sewing!

Sunday, October 13, 2013

Doll Dress, Slip & Panties Patterns

These patterns for a doll dress, slip and panties are from the same vintage World War II pattern books that I was perusing yesterday.  The beauty of these patterns is that they're adaptable to any size doll.  

Like yesterday's apron patterns, having previous sewing experience will be helpful and necessary in drafting and sewing these doll garments.

A Dress to Fit Any Doll


The instructions for the doll dress:
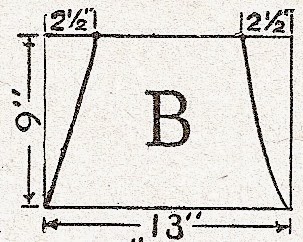
"To make a yoke pattern for a doll's dress, cut two squares of paper as deep and as wide as one quarter of the doll's chest measure plus 1/2 inch.  Divide these pieces into squares as in Diagram 1 and 2 [see below].  Now, draw the yoke outline to cross the squares as shown.  The center front at A, and the center back at B, should be placed on a fold.

"For the sleeve pattern, cut paper as deep as the yoke and twice as wide as the measurement around the top of the doll's arm.  Draw the triangle guide in Diagram 3 [see below], centering the top point and making the base one quarter the depth of the paper from the bottom.  Shape the front of the sleeve top to curve as at the left of the triangle and the back as at the right.  Shape the bottom as shown,  The skirt of the dress is straight and, before gathering, should measure three times around the bottom of the yoke."


Doll Slip and Panties


The instructions for the doll slip and panties:
"The dress yoke pattern may be used as a foundation for shaping the front and back of a slip pattern, as shown by the dotted lines at the left.  The neck and armhole are cut a little deeper than the yoke, and flare is added to the skirt.  The center line, shown here at A [see below], is placed on a fold of the goods in cutting.

"For the front of the panty pattern, cut a piece of paper a little wider than one half the doll's hip measurement and as deep as the length of the panties plus allowance for finishes.  Crease or map the paper in squares, as at B [see below], and use these as guide lines in shaping the crotch and the bottom of the legs, also, the waistline, as shown, The back of the panties is cut like the front except that the waistline is straight."


Once you create the paper patterns for your doll you'll be able to create as many little dresses for her as you want, maybe even a whole new wardrobe!  

These patterns may have come from vintage World War II pattern books but the design is timeless and would certainly make lovely garments today for your special doll.  Enjoy!

Saturday, October 12, 2013

World War II Era Apron Patterns

Back in the day when resources were limited, our foremothers used their creativity and ingenuity to come up with the things that they needed from the things they already had on hand.  These simple yet functional aprons are an example of this "make do or do without" attitude.  These patterns came from a vintage World War II series of craft books.

You'll need to draft the patterns onto larger paper and the very general instructions including measurements and directions are listed here.

These patterns were created for experienced seamstresses who had some sewing skills.

The Frill Apron
This first pattern is a pretty bib apron with ruffles.  It calls for 1-1/2 yards chintz or cotton print fabric and one yard plain fabric 36" wide.


The instructions say:
"For the skirt, cut a piece 27" wide and 23" deep.  Fold lengthwise, as at A (illustration below), then measure down from the top and in from the corners the distance indicated and mark the dots.  Using the dots as a guide, mark the outline of the apron skirt."

Illustration A

The dimensions for the bib are in illustration B (below):


The pocket pattern in illustration C (below):
Illustration C

The instructions for the ties and shoulder straps:  
"The ties are 6" wide and 36" long.  The strip for the belt is 2-1/2" wide.  The shoulder straps are cut 4" wide and then creased through the center."

And for the ruffles:
"The ruffles are cut 6" wide.  The ruffle material before it is gathered should be 2-1/2 times the length of the space it is to fill after gathering.  Use your machine hemmer foot shown here for hemming the ruffles."

Hemmer Foot


Half Aprons
The suggestion for these half aprons was to use unbleached muslin either by-the-yard or back then, flour or feed sacks.

The instructions say:
"The diagram shown here gives you cutting dimensions for the skirt part of a plain little apron; and shows how to shape the waistline.  Belts for half apron are rather wide now -- 2" or 2-1/2" finished.  Ties are generally 4" wide and as long as you like."


The best part about this little project was that ladies were encouraged to have a sewing bee and plan and cut their aprons with a group of friends.  The idea was to trade trimmings and share resources.


Three Aprons Pattern
This is my favorite, three aprons from one length of fabric!

The instructions say:
"You can make your own pattern for this apron with the dimensions in the sketch.  If you are following the trend of using un-dyed materials make the aprons of unbleached muslin, and very gay they will be if you use bright bindings and colorful scraps for the round appliqué flowers and triangle leaves.  The binding will make lattice and finish edges of pockets.  Three aprons may be cut from two yards of 36" fabric with almost no waste."


The cutting diagram: 


If you have some sewing experience you'll find these patterns to be a good guide to get you started.  If you need more guidance in creating an apron, either for yourself or for a gift, visit my shop for some fun, retro full sized paper apron patterns.  The full size paper patterns are ready for use and don't require any drafting.

The vintage pattern books that these patterns came from are full of all kinds of awesome do-it-yourself projects!  These apron patterns will get you started on your own make-do project!

Monday, April 15, 2013

And here's the other free pattern for today, a fun knitting pattern for your older girl.  This vintage pattern is from the 1945 edition of "Minerva Teen-Age Togs" knitting pattern book.  I just love this cover!


Here's the pattern for the booties on the cover of the knitting book:

Two free patterns for girls today, one knitting and the other crochet.  Next time I'll see what I can come up with for patterns for boys!  :-)

Little Girls Dress Crochet Pattern


Today I'll be posting a couple of free vintage patterns, since it's been quite some time since my last post.  The first one is this adorable crochet pattern for your favorite little girl.  This free vintage crochet pattern came from the 1944 edition of "Crochet for Small Fry Dresses Book No. 211."  This is the cover pattern entitled "Daddy's Pal."


Another picture of the little cutie pie!  It looks like this dress would come together quickly and would be a great addition for summer.  There are other dress patterns from this wonderful vintage crochet book and I'll be adding more free patterns before long!